oAuth 登录 GitHub
本次笔记对应 demo:MyReactDemo 对应目录为 /src/demo/github
一、第三方登录的原理
所谓第三方登录,实质就是 OAuth 授权。用户想要登录 A 网站,A 网站让用户提供第三方网站的数据,证明自己的身份。获取第三方网站的身份数据,就需要 OAuth 授权。
举例来说,A 网站允许 GitHub 登录,背后就是下面的流程。
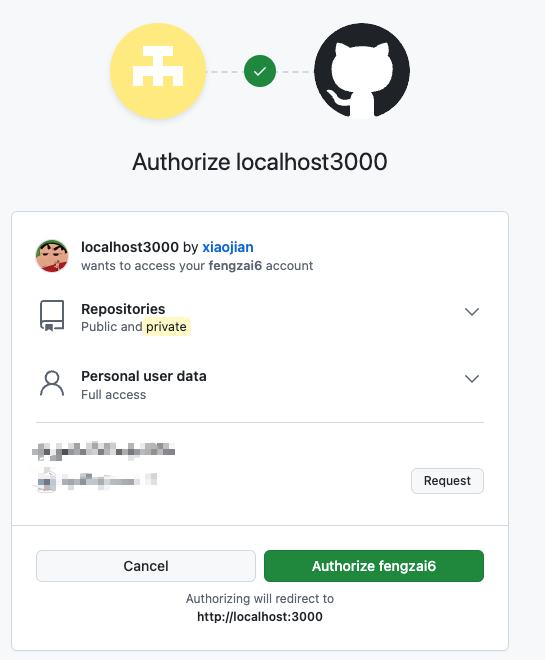
- A 网站让用户跳转到 GitHub。
- GitHub 要求用户登录,然后询问"A 网站要求获得 xx 权限,你是否同意?"
- 用户同意,GitHub 就会重定向回 A 网站,同时发回一个授权码。
- A 网站使用授权码,向 GitHub 请求令牌。
- GitHub 返回令牌.
- A 网站使用令牌,向 GitHub 请求用户数据。
二、应用登记
在 GitHub 中登记一下应用,让 GitHub 知道是谁在请求资源
访问这个网址,填写登记表
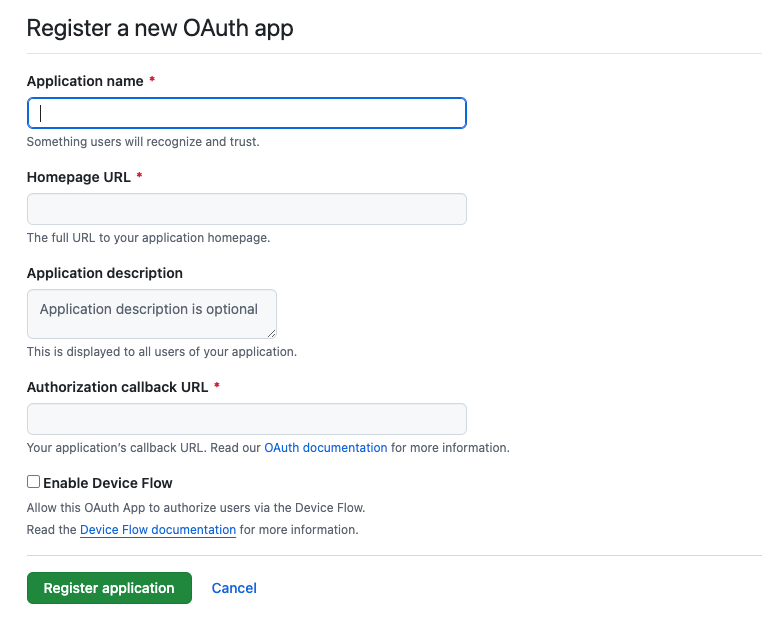
应用的名称随便自己定义,主页 URL 填写你测试网站的 origin URL,如:http://localhost:3000,跳转网址填写你定义好的 callback 地址即可,如:http://localhost:3000/oauth/github/callback
创建好后,GitHub 会显示出一个客户端 ID(client ID),然后手动生成客户端密钥(client secret),这个密钥只会显示一次,需要自行留存好。
客户端只需要使用到客户端 id,不能将密钥存放在客户端,容易泄漏,第三者能够通过密钥和 id 来伪造身份来滥用 oAuth app
三、基本流程
为了本地测试,clientId,clientSecret 使用环境变量读取
1、登录授权
登录首页,也就是一个简单的跳转链接,让用户跳转到 GitHub 进行登录操作

首页代码如下:
export const GitHubDemo = () => {
  const clientId = import.meta.env.VITE_GITHUB_CLIENT_ID;

  const redirectUri = "http://localhost:3000/oauth/github/callback";

  const scopes = ["read:user", "repo"];

  const oAuthUrl = `https://github.com/login/oauth/authorize?client_id=${clientId}&redirect_uri=${redirectUri}&scope=${scopes.join(
    " "
  )}`;

  return (
    <div>
      <h1>GitHub Demo</h1>
      <a href={oAuthUrl}>Login with GitHub</a>
    </div>
  );
};
需要将三个参数拼接到网址中,其中 id 和跳转需要和 GitHub 中 oAuth 显示的一致,否则登录页面会警告 ⚠️
scopes 是该次登录所向用户请求的权限,示例中所请求的为用户和他的库权限,这将在登录页中提示
然后进行授权即可,GitHub 会根据设置的 redirect 链接进行跳转,并且带上授权码
2、拿到授权码
跳转回来的 URL 会是下面的样子
http://localhost:3000/oauth/github/callback?code=ace5dc948a88de306384那么在客户端的 callback 代码中就需要拿到这个 code
const search = useLocation().search;
const code = new URLSearchParams(search).get("code");
拿到 code 了需要做什么呢?当然是可以去申请到 GitHub 的 token 啦,不过这个操作不能够在客户端进行请求,需要把工作交给服务端,客户端将 code 发送给自己的服务端
Callback.tsx > getAccessToken
const getAccessToken = async () => {
  // 向后端发送请求
  try {
    const res = await axios.post(`http://localhost:8080/api/oauth/github`, {
      code: code,
    });

    console.log(res);

    const data = await res.data;

    setAccessToken(data.access_token);
  } catch (error: any) {
    if (error.response) {
      message.error(error.response.data.message);
    } else {
      message.error("server服务可能未运行");
    }
  }
};
3、后端实现
编写一个简单的 node 服务来帮忙获取 token,如下,通过拿到的 code 向 GitHub 请求令牌,最后返回前端
Server.js
// 一个简单的node服务,监听8080端口,用于接收前端的code,并使用axios请求github的access_token返回给前端
import express from "express";
import axios from "axios";
import bodyParser from "body-parser";
import cors from "cors";

const app = express();
const port = 8080;

const clientId = import.meta.env.VITE_GITHUB_CLIENT_ID;
const clientSecret = import.meta.env.VITE_GITHUB_CLIENT_SECRET;
const redirectUri = "http://localhost:3000/oauth/github/callback";

app.use(bodyParser.json());
app.use(cors());

app.post("/api/oauth/github", async (req, res) => {
  const { code } = req.body;

  console.log("Received code:", code);

  try {
    /**
     * Get access token
     * 获取访问令牌不能同源,所以需要在后端代理请求,而且用不了 fetch,因为 fetch 不能跨域?
     */
    const response = await axios.post(
      `https://github.com/login/oauth/access_token`,
      {
        client_id: clientId,
        client_secret: clientSecret,
        code: code,
        redirect_uri: redirectUri,
      },
      {
        headers: {
          Accept: "application/json",
        },
      }
    );

    const data = response.data;
    console.log("response:", response.data);

    if (data.error) {
      throw new Error(data.error_description);
    }

    // 所返回data格式是 { access_token: 'xxx', token_type: 'bearer', scope: 'xxx' }

    res.json(data);
  } catch (error) {
    console.error("Error fetching access token:", error.message);
    res.status(500).json({ error: error.message });
  }
});

app.listen(port, () => {
  console.log(`Server is running on http://localhost:${port}`);
});
4、请求 API 数据
有了令牌以后,就可以向 API 请求数据了。
getUser
javascriptconst getUser = async () => { const res = await axios.get("https://api.github.com/user", { headers: { Authorization: `Bearer ${accessToken}`, }, }); console.log(res); const data = res.data; updateApiData("user", data); };
上面代码中,GitHub API 的地址是https://api.github.com/user,请求的时候必须在 HTTP 头信息里面带上令牌Authorization: Bearer 361507da。
然后,就可以拿到用户数据,得到用户的身份
在要求授权的时候,跳转链接加入了scopes = ["user", "repo"]; 在仅需要获取用户信息情况下是不需要加上这个的,但是为了进一步调用 API 数据,所以加上了这些参数,如需其他权限,可以查阅GitHub 相关文档
那么我们可以拿到用户的某个仓库的 issue 等数据啦,接口文档在这
getIssue function
const getIssues = async () => {
const res = await axios.get(
"https://api.github.com/repos/fengzai6/myreactdemo/issues",
{
headers: {
Authorization: `Bearer ${accessToken}`,
Accept: "application/vnd.github+json",
"X-GitHub-Api-Version": "2022-11-28",
},
}
);
console.log(res);
updateApiData("issues", res.data);
};完整**callback.tsx**
import { Button, Card } from "antd";
import axios from "axios";
import { useEffect, useState } from "react";
import { useLocation } from "react-router-dom";
const PreCode = ({ title, data }: { title: string; data: unknown }) => {
return (
<Card style={{ marginTop: 20 }}>
<h2>{title}</h2>
<pre
style={{ whiteSpace: "pre-wrap", wordWrap: "break-word" }}
className="max-h-96 overflow-y-auto"
>
<code>{JSON.stringify(data, null, 2)}</code>
</pre>
</Card>
);
};
interface IApiData {
user: any;
issues: any;
}
export const GitHubCallback = () => {
const search = useLocation().search;
const code = new URLSearchParams(search).get("code");
const [accessToken, setAccessToken] = useState<string | null>("gho_xxx");
const [apiData, setApiData] = useState<IApiData>({
user: null,
issues: null,
});
const updateApiData = (
key: keyof IApiData,
data: IApiData[keyof IApiData]
) => {
setApiData((prev) => ({ ...prev, [key]: data }));
};
const getAccessToken = async () => {
// 向后端发送请求
try {
const res = await axios.post(`http://localhost:8080/api/oauth/github`, {
code: code,
});
console.log(res);
const data = await res.data;
setAccessToken(data.access_token);
} catch (error: any) {
if (error.response) {
message.error(error.response.data.message);
} else {
message.error("server服务可能未运行");
}
}
};
const getUser = async () => {
  const res = await axios.get("https://api.github.com/user", {
    headers: {
      Authorization: `Bearer ${accessToken}`,
    },
  });

  console.log(res);

  const data = res.data;

  updateApiData("user", data);
};
const getIssues = async () => {
  const res = await axios.get(
    "https://api.github.com/repos/fengzai6/myreactdemo/issues",
    {
      headers: {
        Authorization: `Bearer ${accessToken}`,
        Accept: "application/vnd.github+json",
        "X-GitHub-Api-Version": "2022-11-28",
      },
    }
  );

  console.log(res);

  updateApiData("issues", res.data);
};
return (
<div>
<h1>GitHub Callback</h1>
<Button onClick={getAccessToken}>Get Access Token</Button>
<Button onClick={getUser}>Get User</Button>
<Button onClick={getIssues}>Get Issues</Button>
<h2>Code: {code}</h2>
<h2>Access Token: {accessToken}</h2>
<PreCode title="user" data={apiData.user} />
<PreCode title="issues" data={apiData.issues} />
</div>
);
};四、使用 postMessage 弹窗式登录
或许在某些网站能够看到,进行 oAuth 登录的时候,是弹出一个小窗口用于登录的,有时候就好奇,窗口和窗口之间是怎么通信的呢?原来是 postMessage 在背后运作着
MDN 介绍:
window.postMessage() 方法可以安全地实现跨源通信。通常,对于两个不同页面的脚本,只有当执行它们的页面位于具有相同的协议(通常为 https),端口号(443 为 https 的默认值),以及主机 (两个页面的模数
Document.domain设置为相同的值) 时,这两个脚本才能相互通信。window.postMessage() 方法提供了一种受控机制来规避此限制,只要正确的使用,这种方法就很安全。
这里就不多赘述,有需要可以查阅官方文档
在本次 demo 中,需要改动的是 GitHub Demo 的首页,为此,编写一个 hook 进行使用,该 hook 能够接受到 callback 页面传来的 code,然后发送消息告诉 callback,可以关闭窗口啦
Use-new-window.ts
import { useRef, useEffect } from "react";

/**
 *
 * @param oAuthUrl 跳转的url
 * @returns function openWindow
 */
export const useNewWindow = (oAuthUrl: string) => {
  const width = 500;
  const height = 600;
  const left = window.screenX + (window.innerWidth - width) / 2;
  const top = (window.screen.height - height) / 2;

  const windowFeatures = `width=${width},height=${height},left=${left},top=${top}`;

  // 保存打开的窗口
  const loginWindow = useRef<Window | null>(null);

  // 打开新窗口
  const openWindow = () => {
    loginWindow.current = window.open(oAuthUrl, "_blank", windowFeatures);
  };

  const receiveMessage = (event: MessageEvent) => {
    if (
      event.origin !== "http://localhost:3000" ||
      event.data.source !== "github-callback"
    ) {
      return;
    }

    if (event.data.source === "github-callback") {
      console.log("receiveCode", event.data.code);

      // 通过postMessage发送消息到原窗口提示关闭
      loginWindow.current?.postMessage("close", "http://localhost:3000");
    }
  };

  useEffect(() => {
    window.addEventListener("message", receiveMessage, false);

    return () => {
      window.removeEventListener("message", receiveMessage);
    };
  }, []);

  return { openWindow };
};
那么在首页中就可以简单的使用 hook 来打开新窗口就可以了,更改后的新首页如下
github.tsx
import { Button, Space } from "antd";
import { useNewWindow } from "./use-new-window";

export const GitHubDemo = () => {
  ...此处相同省略

  const { openWindow } = useNewWindow(oAuthUrl);

  return (
    <div className="p-4">
      <h1>GitHub Demo</h1>
      <Space>
        <a href={oAuthUrl}>
          <Button>Login with GitHub</Button>
        </a>
        <Button onClick={openWindow}>Login with GitHub on Popup Window</Button>
      </Space>
    </div>
  );
};
那么在 callback 页面也需要作出一些处理,当获取到 code 的时候,告诉 window.opener 也就是打开这个窗口的 window,最后当确认原窗口收到消息后关闭自己
Callback.tsx
...此处相同省略

export const GitHubCallback = () => {
  ...此处相同省略

  // 通过postMessage发送消息到原窗口
  const sendMessage = (code: string) => {
    window.opener.postMessage(
      {
        source: "github-callback",
        code,
      },
      "http://localhost:3000"
    );
  };

  // 接受消息,关闭窗口
  const receiveMessage = (event: MessageEvent) => {
    if (event.origin !== "http://localhost:3000") {
      return;
    }

    if (event.data === "close") {
      window.close();
    }
  };

  useEffect(() => {
    if (code && window.opener) {
      sendMessage(code);
    }
  }, [code]);

  useEffect(() => {
    window.addEventListener("message", receiveMessage, false);

    return () => {
      window.removeEventListener("message", receiveMessage);
    };
  }, []);

  return (
    <div>
      ...此处相同省略
    </div>
  );
};
注意 ⚠️:当使用弹出式登录的时候,callback 页面就仅仅作为一个接受 code 的页面,所以当收到 code 的后续接口请求都需要移动到接收到 code 的首页进行处理